Ridges around Kathmandu feel like a world away. This short rim hike gives you proper mountain scenery without the long-time-commitment feel, while walking through farm villages and forest on the edge of the valley. I also like how the route mixes views with real everyday life, so the hike doesn’t feel like a sightseeing bus with legs.
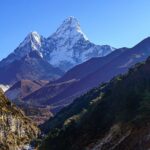
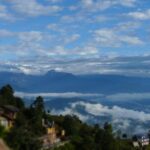
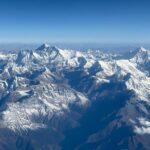
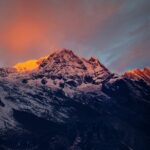
I love the panoramic peak spotting once you reach Chisapani and surrounding viewpoints. On clear days, you’re in position to see Dorje Lakpa, Langtang, Ganesh Himal, Gaurisankar, and even a slice of the Everest range.
One thing to think about: you’ll be walking multi-hours each day, and while it’s described as any fitness level if you can handle long walking, it still helps to come ready for steady effort.
In This Review
- Key Highlights Worth Knowing
- The Kathmandu Valley Rim Idea (And Why It Works)
- Start Morning Right: Thamel Meeting Point and a 7:15 Departure
- Day 1: Sundarijal to Chisapani and the Big View Reward
- Day 2: Chisapani Toward Nagarkot for Classic Vantage Point Time
- Day 3: Nagarkot Down to Changunarayan and a Temple Finish
- The Views You’re Paying For (What You Might Actually See)
- Price and Value: What $381 Includes (and What It Doesn’t)
- Your Guide Makes the Difference: Riman and Multilingual Support
- Walking Days, Real Pacing, and Who This Fits Best
- Practical Tips for Making the Most of Chisapani and Nagarkot
- Should You Book Kathmandu Valley Rim Hike?
- FAQ
- Where does the Kathmandu Valley Rim Hike start?
- What time does the hike start?
- How long is the experience?
- Is this a private tour?
- What language support is available for the guide?
- What does the price include?
- What is not included in the price?
- What passport details are needed?
Key Highlights Worth Knowing
- Rim-walk views north of Kathmandu: Big mountain angles with a quieter feel than the standard city routes
- Forest-to-village walking: Jungle trails with changing vegetation, plus farm and village scenery
- Chisapani viewpoint energy: A strong day-1 payoff after the climb
- Nagarkot scenic stop: A classic vantage point to catch striking morning views
- Changunarayan temple finish: A meaningful end before the drive back to Kathmandu
- Private group option: Only your group participates, with transport handled for you
The Kathmandu Valley Rim Idea (And Why It Works)
This hike is built for people who want mountain views fast, but don’t want a full-blown trek. You’re based around Kathmandu, then spend your days moving along ridges and paths that feel rural and less tour-bus. The “rim” concept matters because you get outlooks over the valley and toward snowcapped peaks rather than only walking through one narrow valley.
The overall structure is simple: start near Sundarijal, climb toward Chisapani, continue toward Nagarkot, then descend toward Changunarayan before heading back. That pacing is a good match for short trips because it gives you at least two strong viewpoint moments, not just one.
And the price-to-inclusions ratio is where this tour starts to make sense. You’re paying for guided walking, two nights of trekking accommodation, meals on trek days, and ground transport—so you’re not stuck trying to cobble together food and logistics for a short hiking window.
You can also read our reviews of more hiking tours in Kathmandu


Start Morning Right: Thamel Meeting Point and a 7:15 Departure
You’ll meet at View Nepal Treks & Expedition, 24 Thamel Marg in Kathmandu, with a start time around 7:15 am. Thamel is convenient for getting to the start without wrestling the whole city first, and the morning departure helps because you’ll usually want daylight for the best walking and scenic views.
You should also plan your day around the fact that this is a private tour/activity with pickup and drop. That means the schedule can feel more “yours,” but it also means you’ll want to be ready on time so the driver and guide don’t end up waiting.
If you’re coming with your passport details already lined up, you’ll feel calmer. The operator requires passport name, number, expiry, and country at booking time, and you need a valid passport on the travel day.
Day 1: Sundarijal to Chisapani and the Big View Reward
Day one starts from Sundarijal and leads to Chisapani, with the hike described as ascending roughly one thousand meters to reach Chisapani’s height. That’s the kind of climb that can feel very manageable if you keep a steady pace, take small breaks, and focus on foot placement on trail.
What I’d pay attention to here is the change in scenery as you go. You’re not just climbing; you’re walking through jungle areas with different vegetation and wildlife possibilities. Even when you’re not seeing rare animals, the variety of plants and the shade can make the climb feel less monotonous.
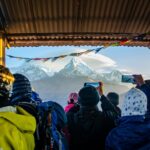
Then comes the payoff: once you’re at/near Chisapani, you can look out over a wide view that includes Dorje Lakpa, Langtang, Ganesh Himal, Gaurisankar, and part of the Everest range. On a clear day, Chisapani is the moment where the hike turns from exercise into scenery you’ll want to stop for again and again.
Potential drawback: if weather is cloudy, you may still enjoy the trail and village atmosphere, but the long-range peak views can be reduced. This is normal for the Himalaya foothills, but it’s good to set your expectations so you don’t feel like you paid for something the sky couldn’t deliver.
Day 2: Chisapani Toward Nagarkot for Classic Vantage Point Time
After Chisapani, you continue north to Nagarkot. This is where the rim-hike format really shows its value: you’re moving from one viewpoint zone to another, and each place has its own “angle” on the mountain show.
Nagarkot is a famous scenic spot for a reason, and the tour includes a visit to Nagarkot View Tower. If you like the idea of a planned viewpoint stop rather than wandering around trying to find the best angle, this part is designed for you.
On this day you also transition from the more forested feeling of the first leg toward the more open ridge-town atmosphere around Nagarkot. In practical terms, that can mean more visibility and wider sky views as you walk.
And you’re not just sightseeing for one hour. You’re on foot for a chunk of the day, then you get the reward of that scenic stop. That’s a nice rhythm if you like travel that includes physical effort and not only a quick photo.
Day 3: Nagarkot Down to Changunarayan and a Temple Finish
The final day is a downhill trek that ends at Changunarayan temple, followed by a drive back to Kathmandu. Descending is often easier on the heart rate than uphill, but it can be harder on the knees and ankles, so I’d bring a little extra care for footing and stride length.
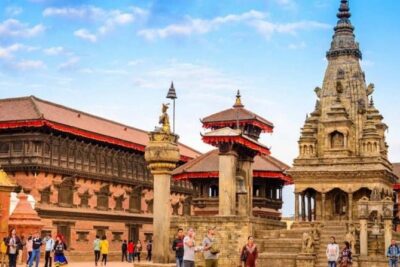
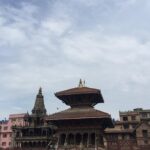
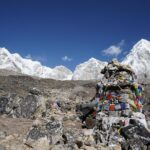
Changunarayan brings the trip full circle by adding a cultural anchor to the mountain walking. Finishing at a temple area helps the trek feel like more than a scenic loop. Even if you don’t get deep into religious details, you’ll likely appreciate the contrast: mountain rim views earlier, then a human landmark at the end.
After the trek, you’re not left improvising transport back. You’ll drive to Kathmandu and the experience ends at the meeting point.
If you’re sensitive to long car rides after hiking, plan to loosen up right after arrival. After days of walking, you can feel stiff even if the drive is comfortable.
The Views You’re Paying For (What You Might Actually See)
This trip is explicitly framed around watching the high peaks from the rim. The listed view names are specific, which is a clue that the route is chosen for viewpoints rather than just the most direct trail.
Key named views to look for include Langtang, Ganesh Himal, Gaurisankar, Dorje Lakpa, and part of the Everest range from the Chisapani area. There’s also mention of panoramic mountain visuals in the shade of pristine forest, which hints at a mix of open views and covered trail segments.
One practical point: visibility in Nepal can change quickly with clouds and wind. So if you’re serious about peak spotting, keep a little flexibility in how long you pause at viewpoints. Even short waits can help when conditions open up.
Price and Value: What $381 Includes (and What It Doesn’t)
At $381 for about three days, the value is strongest because a big chunk of the work is bundled. Your included items are:
- 2 night accommodation in trekking lodging
- All food on trek days (breakfast, lunch, dinner)
- A guide (including potential language support)
- Transport by private vehicle (car/jeep/mini bus/tour bus depending on group size)
- Pickup and drop to the airport
That’s not a small package. Many short hikes in Nepal fall apart because people don’t budget for food and lodging, or they end up scrambling for transport and paying more in the end.
What’s not included is also important for budgeting:
- Food and hotel in Kathmandu outside the trek
- Soft and hard drinks
- Personal expenses, plus Nepal visa and international flight ticket
- Tips for the guide and driver
- Anything not clearly stated as included
My advice: decide early what you’re doing with your Kathmandu nights. If you’re already staying in Kathmandu, make sure you understand which nights are covered by the trekking accommodation so you don’t double-book or pay twice.
Your Guide Makes the Difference: Riman and Multilingual Support
One of the best clues about whether a short hike will feel smooth is the guide. In the available feedback, a solo traveler highlighted a guide named Riman as a standout part of the experience, calling him kind and effective. That kind of personal touch matters more on a short trek because there’s no “extra day” to recover if something feels confusing or uncomfortable.
You can also get language support if needed. The tour includes a guide as per requirement of different languages such as English, Chinese, Spanish, and German. Even if you don’t need those languages, having translation options can improve clarity around trail timing, viewpoint choices, and what to expect.
Also remember: this is a private tour/activity. That means you’re not stuck with an odd group pace that doesn’t match your stride. If you like control over your day, that’s a genuine benefit.
Walking Days, Real Pacing, and Who This Fits Best
The hike is described as doable for any fitness level as long as you can walk multi-hours each day. That wording is honest, but it still helps to match the trip to how you like to travel.
This will suit you if:
- You want a short trip that still feels like a real hike
- You enjoy countryside walking and forest trails
- You want mountain views and a cultural finish at a temple area
- You prefer having transport and meals handled
It might not be your best match if you:
- Want minimal walking time
- Hate descents (day 3 includes trekking down)
- Expect city-level comfort for the entire trip (you’ll be in trekking accommodation for two nights)
A little planning goes a long way. Wear shoes that are already broken in, bring a light layer system for morning shade and midday sun, and expect weather shifts around the ridges.
Practical Tips for Making the Most of Chisapani and Nagarkot
For viewpoint days, treat your breaks like part of the experience. Don’t just stop for photos; slow down and let your eyes scan for different peak silhouettes as the light changes. The tour’s strongest viewing moments are tied to specific places, so being ready to spend time at viewpoints helps.
Also keep your water and snacks strategy simple. Since meals on trek days are included, you won’t be hunting for lunch on the trail, but you may still want a small personal supply depending on how long you like to pause.
Finally, take advantage of the guide’s knowledge of the trail and timing. A good guide helps you avoid racing for the sake of it, which usually leads to better views anyway because you arrive less rushed.
Should You Book Kathmandu Valley Rim Hike?
Book it if you want big Himalayan viewpoints north of Kathmandu, plus a walking route that includes forest, rural villages, and a temple finish. The value is strong for short-trip travelers because meals, guided support, two nights of trekking accommodation, and ground transport are all included.
Skip it (or at least reconsider) if you’re not comfortable with several hours of walking each day, or if your schedule can’t absorb weather swings that affect distant peaks. This is a hike built around scenery, so clarity in the sky matters.
If you’re on a tight timeframe and you want a structured, private, guided way to see a different side of the Kathmandu Valley, this one earns a serious look.
FAQ
Where does the Kathmandu Valley Rim Hike start?
It starts at View Nepal Treks & Expedition P. Ltd., 24 Thamel Marg, Kathmandu 44600, Nepal.
What time does the hike start?
The start time is listed as 7:15 am.
How long is the experience?
It’s listed as 3 days (approximately).
Is this a private tour?
Yes. It’s a private tour/activity, and only your group participates.
What language support is available for the guide?
The guide can support multiple languages such as English, Chinese, Spanish, and German, depending on your needs.
What does the price include?
Included are 2 night accommodation in trekking, all trekking meals (breakfast, lunch, dinner), a guide (for tour and trekking as required), transport by private vehicle, and pickup/drop to the airport.
What is not included in the price?
Not included: food and hotel in Kathmandu, soft and hard drinks, personal expenses, Nepal visa, international flights, grocery/shopping, and tips for the guide and driver.
What passport details are needed?
You need a current valid passport. Passport name, number, expiry, and country are required at booking, and you must have a valid passport on the day of travel.